
Why Your Garage Door Safety Sensors Keep Blinking (And Won't Close)
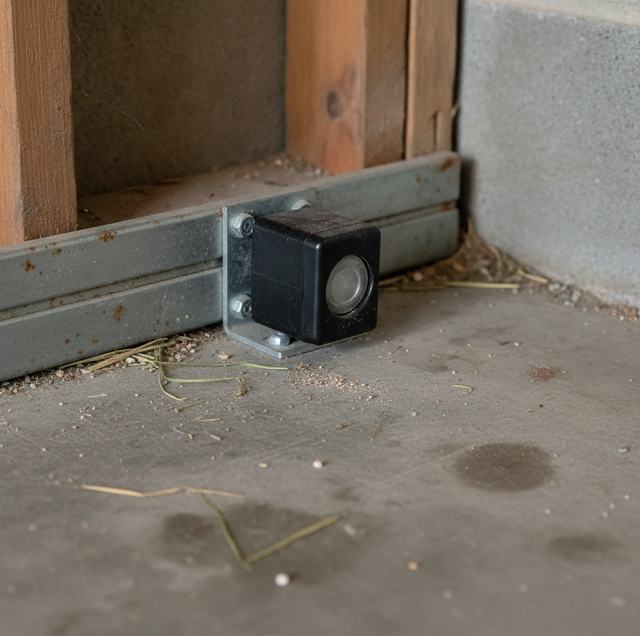
Quick Answer: Garage door safety sensors blink when the invisible beam between the two eyes is broken, or the sensors have lost alignment with each other. The most common reasons are a small bump that knocked one eye off aim, a dirty lens, an object in the beam path, direct sun glare, or a loose wire. Clear the path, wipe both lenses, and re-aim the brackets until both LEDs stop blinking. Never disable the sensors to force the door shut.
You hit the button, the door starts down, then it stops and rolls back up. Down by the floor on each side of the opening, a little light is blinking at you. That blinking light is not a malfunction so much as a message. Your garage door is refusing to close because its safety system thinks something is in the way, and it would rather look foolish than crush whatever might be under it.
Those two small units near the ground are the photo-eye safety sensors. Understanding what they do, and why they blink, takes the mystery out of a problem that sends a lot of people reaching for the phone when a rag and two minutes of patience would have handled it.
How the Photo-Eye System Actually Works
Since the early 1990s, residential garage door openers have been required to include a photo-eye system. The idea is simple. One sensor sits a few inches off the floor on one side of the opening, and a matching sensor sits directly across from it on the other side. One eye sends a focused beam of invisible infrared light straight across the doorway. The other eye watches for that beam.
As long as the receiving eye can see the beam, the opener knows the path is clear and lets the door travel down. The instant the beam is interrupted, whether by a person, a pet, a trash can, or the sensors simply losing sight of each other, the opener stops the door and sends it back up. On many units, the sensor LED starts blinking at the same moment to tell you the beam is gone.
Think of the two sensors like two people trying to hold a taut string across a doorway. If both hold their end steady, the string stays tight and level. If one person shifts even slightly, or someone walks through and bumps it, the string goes slack and the connection breaks. The photo-eyes work the same way, except the string is a beam of light, and the slack shows up as a blinking light instead of a closing door.
This is a safety device first and a convenience second. It exists so a door cannot close on a child, a pet, or the back bumper of a car. That framing matters for everything below, because the goal is never to make the blinking stop by any means available. The goal is to restore the beam so that the safety feature works as it should.
What the Blinking Is Trying to Tell You
Here is the part most homeowners miss. The two sensors usually behave differently, and learning to read them cuts your troubleshooting time in half.
On a typical setup, one sensor is the sender and the other is the receiver. The sender normally shows a steady light that does not change much. The receiver is the talker. When it can see the beam clearly, its light holds steady. When the beam is broken, weak, or misaligned, the receiver light starts to blink. So a blinking light is almost always the receiver telling you it has lost the beam.
That single fact points you in the right direction. If a light is blinking, you are not looking for a broken sensor first. You are looking for whatever is standing between the two eyes or whatever has nudged them out of line with each other.
The Usual Suspects, From Most to Least Common
Blinking sensors come from a short list of causes. Working through them in order of likelihood saves time.
Misalignment- This is the number one cause by a wide margin. The beam is narrow, and the sensors have to point almost perfectly at each other. A bicycle handlebar, a stray basketball, a bump from the mower, or a bracket that has slowly sagged over the years can shift an eye just enough to break the line. If nothing is visibly in the way and the lenses look clean, alignment is the first thing to check.
An obstruction in the beam- Sometimes the answer is embarrassingly simple. A recycling bin, a garden hose looped across the floor, a broom leaning against the wall, or a box sitting an inch too far into the opening can all sit right in the beam path. Because the beam is only a few inches off the ground, low clutter is easy to overlook.
A dirty lens- Each sensor has a small, clear lens over the eye. Dust, cobwebs, spider silk, grass clippings, and fine grit build up on that lens over time. Enough buildup scatters or blocks the beam even though nothing is visibly in the way. In a dusty garage, this is a frequent offender.
Direct sunlight: Low sun shining straight into the receiver lens can overwhelm the infrared beam and cause the receiver to read as blocked. This is why a door that closes fine all day can suddenly balk when the afternoon sun drops to the right angle.
A loose, pinched, or corroded wire- The sensors connect back to the opener with thin, low-voltage wire, often stapled along the wall and track. A staple driven too tight, a wire nicked during another project, or a corroded connection at the terminal can weaken or cut the signal. Wiring faults tend to produce blinking that comes and goes, or that appears when the wire is jostled.
A failing sensor- Sensors do wear out, but far less often than people assume. If you have cleaned, re-aimed, and confirmed the wiring, and one eye still refuses to hold steady, the sensor itself may be at the end of its life.
Low or failing power- A sensor getting weak or intermittent power from the opener can blink without any beam problem at all. This usually shows up alongside other opener quirks.
Water or condensation- Moisture inside a sensor housing, from a sprinkler, a wash-down, or seasonal condensation, can fog the lens from the inside or corrode the internals. Dry climates see this less than wetter ones, but a garage that gets hosed out is not immune.
Dust and Temperature, Both Ways
Two environmental factors deserve a specific mention, and they cut in more than one direction.
Fine dust is the first. Where the air carries a lot of grit, it settles on the sensor lenses and works its way into the wiring connections far faster than in a clean, humid setting. A lens that might stay clear for a year in still air can haze over in a season in a dusty spot. So the cleaning step matters more and needs to be done more often.
Temperature is the second. Long stretches of high heat can make a marginal wire connection expand and lose contact, so a sensor that behaves in the cool of the morning may start blinking once the garage heats up in the afternoon. Cold cuts the same way. On a chilly morning, a connection that has contracted in the cold can read as intermittent until things warm up. The point is that temperature swings in either direction stress the same weak spots, which is why a marginal connection tends to reveal itself as the day heats and cools.
What You Can Safely Fix Yourself
Most blinking-sensor problems are within reach of a homeowner. Work through these in order, and stop when the blinking stops.
Clear the beam path- Walk through the opening and move anything sitting low near either sensor. Look for the small stuff: a hose, a leaning tool, a pet bed nudged too close, a box that crept forward.
Wipe both lenses- Use a soft, dry or barely damp cloth and gently clean the clear lens on each sensor. Do not use harsh solvents. Get the cobwebs and dust off, then look at the lights again.
Re-aim the sensors- This is the fix that solves the most cases. Loosen or simply grip the bracket and adjust the aim of each eye so they point straight at each other. Watch the LEDs as you do it. When both eyes see the beam, the blinking receiver light will settle to a steady glow. Some people sight down the sensors by eye; others move one a hair at a time until the light goes solid.
Gently adjust the brackets- If a bracket has been bent or knocked, you can often ease it back into rough alignment by hand, then fine-tune the aim. Go gently. The wing-nut or screw that holds the bracket usually only needs to be snugged, not cranked.
Check for pinched or loose wire- Follow the sensor wire with your eyes where you can reach it safely. Look for a staple biting into the insulation, a spot where the wire has been nicked, or a connection that has worked loose. Do not start splicing or rewiring; you are only looking for the obvious.
If, after clearing, cleaning, and re-aiming, both lights hold steady and the door closes, you are done. That covers the large majority of cases.
When to Bring in a Professional
Some faults sit past the line of safe DIY, and there is no shame in stopping there.
Call a technician when the wiring itself is the problem, meaning a break, a corroded run, or a fault you cannot trace. Call when a sensor needs replacement and match it to your opener. Call when the trouble points are on the opener's logic board rather than the sensors, which shows up as odd behavior that the sensors alone cannot explain. And call when you have worked through every homeowner step, and the lights still will not hold steady, because at that point, you are past the easy causes and into the parts that need testing and proper tools.
One rule holds through all of it. The photo-eyes are a safety device, and defeating them is never the answer. Do not tape a sensor to a wall pointed at nothing, do not twist the wires together to fool the opener, and do not hold the wall button to override the reversal on a door that has a real obstruction. Those shortcuts remove the exact protection the system was built to provide. And whatever you are doing, never stand or reach under a moving door.
Read the blinking light as information, work the causes from most likely to least, and most of the time you will have the door closing again in a few minutes with nothing more than a cloth and a steady hand.
Frequently Asked Questions
One eye is the sender, and the other the receiver; the receiver is the one that blinks when it loses the beam. The catch is that the color convention varies by brand. Some use a green LED on the sending eye and amber on the receiver; others reverse it. Because there is no universal rule, the opener's manual is what tells you which unit is which on your model, and what a steady versus a blinking color is supposed to mean for that particular brand.
Yes. Low sun shining straight into the receiver lens can wash out the infrared beam, so the receiver reads the opening as blocked, which is why a door that closes fine most of the day can balk when afternoon glare hits a certain angle. There are two fixes that stop it for good. A small sun shield or hood over the receiver lens keeps direct glare off, and swapping the sender and receiver sides moves the vulnerable eye out of the sun's line. Either one stops the afternoon light from overwhelming the beam.
Very little. The beam is narrow, so a small bump to a bracket, a slightly sagging sensor, or a nudge from a passing object can be enough to break the line even though the eyes still look like they are pointing at each other. That narrow tolerance is exactly why patiently re-aiming both eyes until the LEDs go steady resolves so many cases.
Most often, the two eyes are simply out of alignment: the beam is narrow, and a bracket nudged even a few degrees off-aim breaks the line, while both eyes still look like they point at each other. The next most common invisible cause is direct sun glare on the receiver lens, which washes out the infrared beam, causing the receiver to read the clear opening as blocked. A dirty lens, a spider web across the beam, or a loose or corroded wire can do the same. Because none of these leave a visible object in the doorway, re-aim both eyes and shade the receiver from low sun before you assume a sensor has failed.
No, and it is worth knowing why the sensors are there at all: photo-eye reversal has been a federal requirement on residential openers since 1993, precisely because doors were closing on people and pets. Disabling or fooling them strips out that mandated protection, which is especially dangerous in a home with children or pets who move quickly and quietly, and it can also leave you liable if the defeated door injures someone. If the door will not close, fix the beam rather than defeating the system that watches it.
Grit does more than settle on the lens. Over time, blown grit abrades the lens surface, hazing the clear window the beam has to pass through, and it works its way into the terminal screws where the wire connects. That is why a dusty install needs more than a quick wipe. The lenses need cleaning, and the wire connections need tightening and protection, so the grit cannot loosen a terminal or further scratch the lens. A gentle wipe alone leaves the connection and the abraded surface unaddressed.
Call the pros for a sensor or opener that won't behave — and get your door closing safely again. Mesa Garage Door Repair serves Mesa and the East Valley. ROC #341884. Call (480) 906-4474.
